When Your API Requests Hit the ALB Wall: Navigating the 1MB Request Body Limit
You've built a robust API, designed for scale, sitting behind an AWS Application Load Balancer (ALB). Your frontend sends a large payload—perhaps a multi-part form with a high-resolution image, a bulk data import via JSON, or a document upload—and suddenly, you're hit with cryptic errors. Sometimes it's a 413 Payload Too Large, other times a connection reset, or even stranger, the request simply never reaches your target application. If you've encountered this, you're likely grappling with the ALB's hard limit on HTTP/HTTPS request body size: 1MB.
This isn't a bug; it's a fundamental design choice by AWS for ALBs. While often overlooked until it becomes a blocker, understanding this limit and knowing how to architect around it is crucial for any senior engineer working with modern cloud-native applications. This article will dissect the 1MB limit, demonstrate how to diagnose it, and provide robust, production-ready strategies—complete with runnable code examples—to handle large request bodies effectively.
The 1MB ALB Request Body Limit: What You Need to Know
The AWS Application Load Balancer imposes a strict 1MB (1,048,576 bytes) limit on the size of the HTTP/HTTPS request body. This applies to both HTTP/1.1 and HTTP/2 requests. If a client sends a request with a body larger than this, the ALB will terminate the connection and return a 413 Payload Too Large HTTP status code to the client, or in some cases, simply drop the connection without a clear error message depending on the client's behavior and the exact timing.
Why this limit? It's primarily for operational stability, security, and resource management. ALBs are shared infrastructure, and preventing individual clients or malicious actors from sending excessively large payloads helps protect the load balancer itself and downstream targets from resource exhaustion or Denial-of-Service (DoS) attacks. It encourages developers to adopt more efficient patterns for large data transfers.
Crucial Clarification: The 1MB limit applies to the raw bytes of the request body as received by the ALB. If your client compresses the request body (e.g., using GZIP with
Content-Encoding: gzip), the 1MB limit applies to the compressed size. The ALB does not decompress the body before applying this limit or forwarding it to the target.
Where This Limit Bites Hard
- File Uploads: Images, videos, documents, or any binary data sent directly in a POST/PUT request body.
- Large JSON/XML Payloads: Complex data structures, bulk inserts, or configuration updates that exceed the byte limit after serialization.
- Base64 Encoded Data: Embedding images or other binary data directly within JSON payloads (e.g.,
"image_data": "data:image/png;base64,iVBORw0KG...") can quickly inflate the payload size. - Multi-part Forms: While individual form fields are small, combining several files or large text areas can push the total request body over the edge.
Diagnosing the 1MB Limit Issue
Identifying that the ALB limit is the culprit can sometimes be tricky because the error might manifest differently across various clients and scenarios. Here’s how to effectively diagnose it:
1. ALB Access Logs
This is your primary source of truth. Enable access logs for your ALB and send them to an S3 bucket. You can then query these logs using AWS Athena or another log analysis tool. Look for entries where:
elb_status_codeis413.target_status_codeis also-(meaning the request never reached the target).request_processing_timeis very low, often close to0.000.
An example log entry (simplified) might look like this:
http 2023-10-27T10:30:00.123456Z app/my-alb/1234567890abcdef 192.0.2.1:12345 10.0.0.1:80 0.000 0.000 - 413 - 1234567890 0 "POST https://example.com:443/upload HTTP/1.1" "Mozilla/5.0" - - arn:aws:elasticloadbalancing:us-east-1:123456789012:targetgroup/my-tg/fedcba9876543210 "Root=1-653ba000-abcdef1234567890abcdef" "-" "-"
Notice the 413 in the elb_status_code field and the - for target_status_code.
2. CloudWatch Metrics
Monitor the following CloudWatch metrics for your ALB:
HTTPCode_ELB_4XX_Count: An increase in this metric, particularly when coupled with large request attempts, is a strong indicator.RejectedConnectionCount: While not specific to request body size, a spike here can sometimes correlate with ALB-level rejections.
3. Client-Side Errors
The error messages you receive on the client side can vary. Common ones include:
413 Payload Too Large(most common and clearest)net::ERR_CONNECTION_RESET(Chrome) or similar connection termination errors.- Generic network errors indicating the request failed before a full response.
Strategies for Bypassing or Managing the 1MB Limit
Since you can't configure the ALB to increase this limit, the solution lies in re-architecting how large data is handled. Here are the most effective strategies:
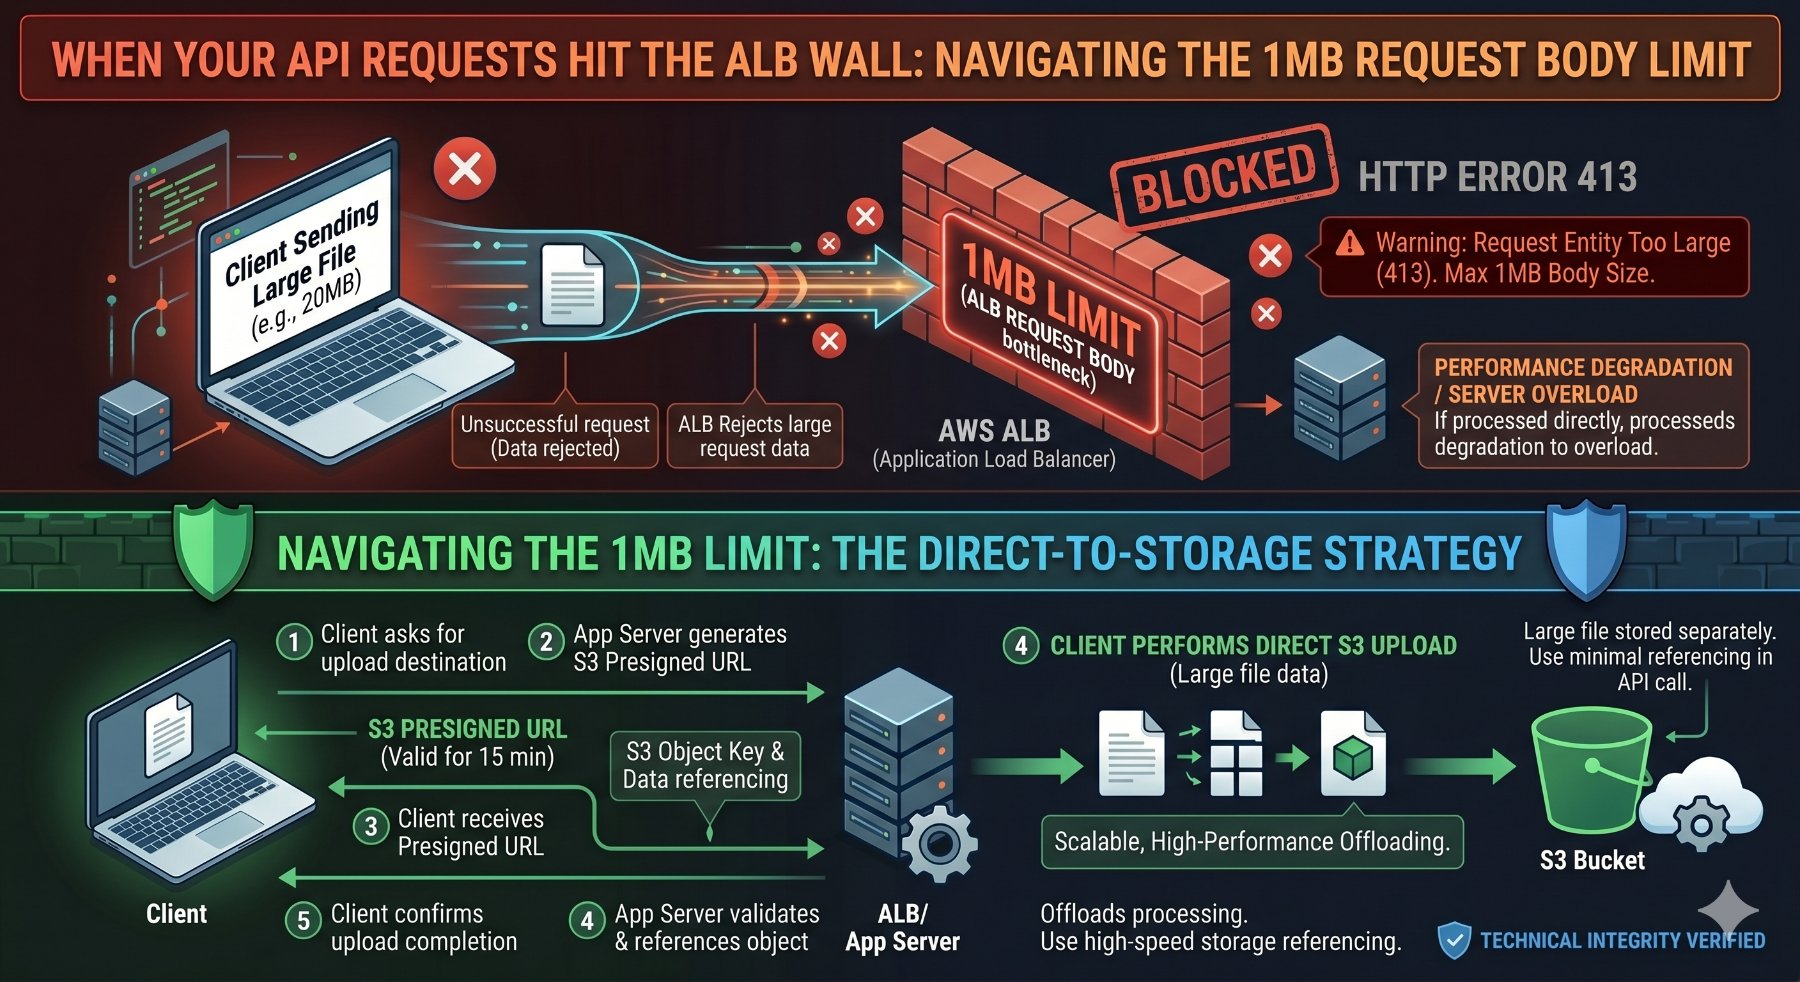
1. Direct Client-to-S3 Uploads (Recommended for Files)
This is the gold standard for handling large file uploads. Instead of sending the file through your ALB and backend API, the client uploads the file directly to an Amazon S3 bucket. Your backend then only receives a small request containing the S3 object key or a reference to the uploaded file.
How it Works:
- Client initiates an upload request to your backend API (via ALB).
- Your backend API generates a pre-signed S3 URL. This URL grants temporary, limited permission to upload a file directly to a specific S3 location.
- The backend returns this pre-signed URL to the client.
- The client uses the pre-signed URL to upload the file directly to S3, bypassing the ALB and your backend for the large data transfer.
- After the S3 upload is complete, the client sends a small, follow-up request to your backend API (again, via ALB) to notify it of the successful upload and provide the S3 object key.
- Your backend can then process the file from S3 (e.g., trigger a Lambda function, store metadata in a database, etc.).
Advantages:
- Scalability: S3 is designed for massive scale and high throughput.
- Cost-Effective: Reduces load on your compute instances and ALB.
- Reliability: S3 handles retries and ensures data integrity.
- Security: Pre-signed URLs are time-limited and scoped to specific actions.
- Performance: Direct upload often provides better performance for the client.
Disadvantages:
- Client-side Complexity: Requires more sophisticated client-side logic to handle the multi-step upload process.
- CORS Configuration: Your S3 bucket must be correctly configured for Cross-Origin Resource Sharing (CORS) to allow direct uploads from your client's domain.
Code Example: Direct S3 Upload with Python Backend & JavaScript Frontend
First, ensure your S3 bucket has the correct CORS configuration. Replace your-bucket-name and your-frontend-domain.
<!-- S3 Bucket CORS Configuration (XML) -->
<CORSConfiguration>
  <CORSRule>
    <AllowedOrigin>https://your-frontend-domain.com</AllowedOrigin>
    <AllowedMethod>GET</AllowedMethod>
    <AllowedMethod>PUT</AllowedMethod>
    <AllowedHeader>*</AllowedHeader>
  </CORSRule>
</CORSConfiguration>
Next, the Python (Flask) backend to generate the pre-signed URL:
# app.py (Python Flask Backend)
import os
import boto3
from flask import Flask, request, jsonify
from flask_cors import CORS
from botocore.exceptions import ClientError

app = Flask(__name__)
CORS(app) # Enable CORS for all routes

S3_BUCKET_NAME = os.environ.get('S3_BUCKET_NAME', 'your-pookietech-upload-bucket')
S3_REGION = os.environ.get('S3_REGION', 'eu-west-1') # Or your desired region

s3_client = boto3.client('s3', region_name=S3_REGION)

@app.route('/api/generate-presigned-url', methods=['POST'])
def generate_presigned_url():
    data = request.json
    if not data or 'fileName' not in data or 'fileType' not in data:
        return jsonify({'error': 'Missing fileName or fileType'}), 400

    file_name = data['fileName']
    file_type = data['fileType']

    # Generate a unique key for the S3 object
    # For production, consider using UUIDs or user-specific paths
    s3_object_key = f"uploads/{os.urandom(16).hex()}-{file_name}"

    try:
        # Generate a pre-signed URL for PUT operation
        response = s3_client.generate_presigned_url(
            'put_object',
            Params={
                'Bucket': S3_BUCKET_NAME,
                'Key': s3_object_key,
                'ContentType': file_type
            },
            ExpiresIn=3600 # URL valid for 1 hour
        )
        return jsonify({
            'presignedUrl': response,
            's3ObjectKey': s3_object_key
        })
    except ClientError as e:
        app.logger.error(f"Error generating pre-signed URL: {e}")
        return jsonify({'error': 'Could not generate pre-signed URL'}), 500

@app.route('/api/upload-complete', methods=['POST'])
def upload_complete():
    data = request.json
    if not data or 's3ObjectKey' not in data:
        return jsonify({'error': 'Missing s3ObjectKey'}), 400

    s3_object_key = data['s3ObjectKey']

    # Here, you would typically:
    # 1. Store metadata about the file in your database.
    # 2. Trigger a Lambda function to process the file (e.g., resize image, scan for viruses).
    # 3. Verify the file exists and is accessible.

    app.logger.info(f"File uploaded successfully to S3: {s3_object_key}")
    return jsonify({'message': f'File {s3_object_key} processed successfully.'})

if __name__ == '__main__':
    # Ensure S3_BUCKET_NAME is set in your environment
    if not S3_BUCKET_NAME:
        print("Error: S3_BUCKET_NAME environment variable not set.")
        exit(1)

    # For local development, set FLASK_ENV=development
    # and install python-dotenv to load .env file
    # pip install python-dotenv
    # In .env: S3_BUCKET_NAME=your-pookietech-upload-bucket
    app.run(debug=True, port=5000)
And the Vanilla JavaScript frontend:
// index.html (JavaScript Frontend)
<!DOCTYPE html>
<html lang="en">
<head>
    <meta charset="UTF-8">
    <meta name="viewport" content="width=device-width, initial-scale=1.0">
    <title>Direct S3 Upload</title>
    <style>
        body { font-family: sans-serif; margin: 20px; }
        #uploadProgress { margin-top: 10px; }
    </style>
</head>
<body>
    <h1>Upload Large File Directly to S3</h1>
    <input type="file" id="fileInput" />
    <button onclick="uploadFile()">Upload</button>
    <div id="uploadProgress"></div>
    <div id="statusMessage"></div>

    <script>
        const backendBaseUrl = 'http://localhost:5000/api'; // Replace with your ALB URL

        async function uploadFile() {
            const fileInput = document.getElementById('fileInput');
            const statusMessage = document.getElementById('statusMessage');
            const uploadProgress = document.getElementById('uploadProgress');
            const file = fileInput.files[0];

            if (!file) {
                statusMessage.textContent = 'Please select a file first.';
                return;
            }

            statusMessage.textContent = 'Initiating upload...';
            uploadProgress.textContent = '';

            try {
                // Step 1: Request a pre-signed URL from your backend
                const generateUrlResponse = await fetch(`${backendBaseUrl}/generate-presigned-url`, {
                    method: 'POST',
                    headers: {
                        'Content-Type': 'application/json',
                    },
                    body: JSON.stringify({
                        fileName: file.name,
                        fileType: file.type,
                    }),
                });

                if (!generateUrlResponse.ok) {
                    const errorData = await generateUrlResponse.json();
                    throw new Error(`Failed to get pre-signed URL: ${errorData.error || generateUrlResponse.statusText}`);
                }

                const { presignedUrl, s3ObjectKey } = await generateUrlResponse.json();
                statusMessage.textContent = `Pre-signed URL obtained. Uploading ${file.name} directly to S3...`;

                // Step 2: Upload the file directly to S3 using the pre-signed URL
                const xhr = new XMLHttpRequest();
                xhr.open('PUT', presignedUrl);
                xhr.setRequestHeader('Content-Type', file.type);
                // If you need custom headers for S3 (e.g., Cache-Control), set them here
                // xhr.setRequestHeader('Cache-Control', 'max-age=31536000');

                xhr.upload.addEventListener('progress', (e) => {
                    if (e.lengthComputable) {
                        const percent = Math.round((e.loaded / e.total) * 100);
                        uploadProgress.textContent = `Upload Progress: ${percent}%`;
                    }
                });

                xhr.onload = async () => {
                    if (xhr.status >= 200 && xhr.status < 300) {
                        statusMessage.textContent = 'File uploaded to S3. Notifying backend...';

                        // Step 3: Notify your backend that the upload is complete
                        const notifyBackendResponse = await fetch(`${backendBaseUrl}/upload-complete`, {
                            method: 'POST',
                            headers: {
                                'Content-Type': 'application/json',
                            },
                            body: JSON.stringify({ s3ObjectKey }),
                        });

                        if (!notifyBackendResponse.ok) {
                            const errorData = await notifyBackendResponse.json();
                            throw new Error(`Failed to notify backend: ${errorData.error || notifyBackendResponse.statusText}`);
                        }

                        statusMessage.textContent = `Upload and backend notification complete! S3 Key: ${s3ObjectKey}`;
                        uploadProgress.textContent = '';
                    } else {
                        throw new Error(`S3 upload failed with status ${xhr.status}: ${xhr.statusText}`);
                    }
                };

                xhr.onerror = () => {
                    throw new Error('Network error during S3 upload.');
                };

                xhr.send(file);

            } catch (error) {
                console.error('Upload failed:', error);
                statusMessage.textContent = `Upload failed: ${error.message}`;
                uploadProgress.textContent = '';
            }
        }
    </script>
</body>
</html>
2. Client-Side GZIP Compression (for Large JSON/Text Payloads)
As mentioned, the 1MB limit applies to the compressed request body if the client sends it with Content-Encoding: gzip. For large JSON payloads or other text-based data, client-side GZIP compression can significantly reduce the payload size, potentially bringing it under the 1MB limit.
How it Works:
- The client (e.g., browser JavaScript) compresses the request body data (e.g., a large JSON string) using GZIP.
- The client sends the compressed data with the
Content-Encoding: gzipheader. - The ALB receives the compressed payload. If its size is <= 1MB, it forwards it.
- Your backend application receives the compressed payload and the
Content-Encoding: gzipheader. - Your backend application decompresses the payload before processing it.
Advantages:
- Simplicity (for suitable cases): Can be relatively straightforward to implement if the payload reduction is sufficient.
- No S3 Integration: Keeps the data flow entirely through your API.
Disadvantages:
- Limited Effectiveness: Only works if the compressed size is below 1MB. Binary data (like images) doesn't compress well if already compressed, and even text data might still exceed 1MB if it's extremely large.
- CPU Overhead: Client and server incur CPU cost for compression/decompression.
- Browser Support: Modern browsers support
CompressionStream, but older ones might require a library.
Code Example: Client-Side GZIP with JavaScript & Python Backend
Vanilla JavaScript for client-side compression (using modern CompressionStream API):
// JavaScript Frontend (example for client-side GZIP)
<!DOCTYPE html>
<html lang="en">
<head>
    <meta charset="UTF-8">
    <meta name="viewport" content="width=device-width, initial-scale=1.0">
    <title>GZIP Compressed Upload</title>
    <style>
        body { font-family: sans-serif; margin: 20px; }
        textarea { width: 80%; height: 200px; margin-bottom: 10px; }
        #statusMessage { margin-top: 10px; }
    </style>
</head>
<body>
    <h1>Upload Large JSON (GZIP Compressed)</h1>
    <textarea id="jsonPayload" placeholder="Enter large JSON payload here..."></textarea><br/>
    <button onclick="sendCompressedPayload()">Send Compressed Payload</button>
    <div id="statusMessage"></div>

    <script>
        const backendBaseUrl = 'http://localhost:5000/api'; // Replace with your ALB URL

        // Function to create a large dummy JSON payload for testing
        function createLargeJson() {
            const data = {
                items: []
            };
            for (let i = 0; i < 10000; i++) { // 10,000 items, adjust for size
                data.items.push({
                    id: i,
                    name: `Item ${i}`,
                    description: `This is a very long description for item number ${i}. It needs to be long enough to make the JSON payload substantial. We are testing the ALB limit, so we want to ensure the uncompressed size is well over 1MB. Lorem ipsum dolor sit amet, consectetur adipiscing elit. Sed do eiusmod tempor incididunt ut labore et dolore magna aliqua. Ut enim ad minim veniam, quis nostrud exercitation ullamco laboris nisi ut aliquip ex ea commodo consequat.`,
                    tags: ['tag1', 'tag2', 'tag3', 'tag4', 'tag5'],
                    details: {
                        color: 'blue',
                        size: 'XL',
                        weight: 1.23,
                        isActive: true
                    }
                });
            }
            return JSON.stringify(data);
        }

        document.getElementById('jsonPayload').value = createLargeJson();


        async function sendCompressedPayload() {
            const jsonPayloadText = document.getElementById('jsonPayload').value;
            const statusMessage = document.getElementById('statusMessage');

            statusMessage.textContent = 'Compressing payload...';

            try {
                const textEncoder = new TextEncoder();
                const originalData = textEncoder.encode(jsonPayloadText);

                // Check original size
                console.log(`Original payload size: ${originalData.byteLength} bytes`);

                // Use CompressionStream API for GZIP compression
                // Browser support: Chrome 80+, Firefox 90+, Safari 15.4+
                // For wider support, consider a library like pako (npm install pako)
                if (!window.CompressionStream) {
                    statusMessage.textContent = 'Error: CompressionStream API not supported by your browser. Use a polyfill or library like pako.';
                    console